
When it comes to fonts, Squarespace gives you lots of font options to use on your website, which is great but can be overwhelming, since there’s no easy way to separate the new and trendy fonts from the old and outdated ones. Sounds familiar?
Squarespace Font Combinations
Squarespace font combinations can have a huge impact on the user experience of a website. The right font combination can make a website visually appealing, easy to read, and professional. This is why most web designers want to have full control over their font choices and pairings. And although it looks intimidating to try, adding custom fonts to Squarespace websites requires just a bit of tweaking.
Repeat After Me: “CSS Is Good, CSS Is Fun”
Today, we’re gonna show you how to upload ANY font to Squarespace in 3 easy steps. It requires just a tiny CSS code, nothing too scary, I promise.
If you want to gain more control over your website, you should consider learning the basics of HTML and CSS. You can learn all the basics for free on W3 School.
How To Upload Custom Fonts To Squarespace
To Use Custom Fonts On Your Squarespace Website, You Can Follow These Steps:
1. Select Your Custom Fonts
Choose the custom fonts you want to use on your website. Make sure the fonts are in the correct file format for web use, such as TTF, OTF, WOFF, or WOFF2.
2. Upload Your Custom Fonts To Squarespace
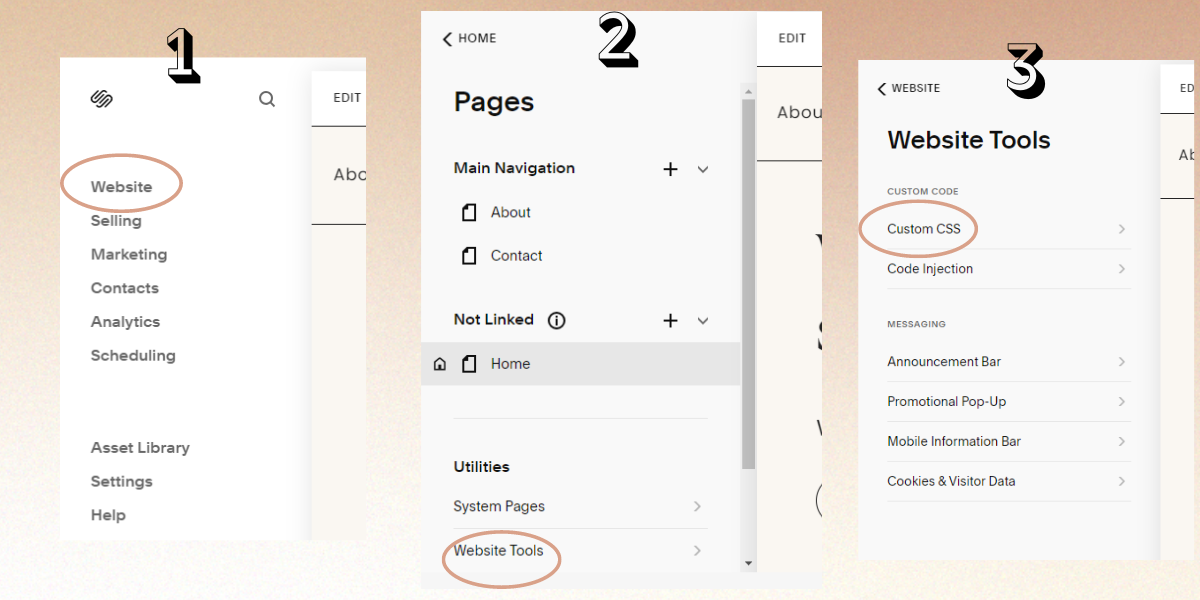
After choosing the font of your choice, go to your website’s dashboard on Squarespace > Website > Website tools > Custom CSS.
Next, click on Custom Files and upload your custom font file.
3. Assign Your Custom Fonts
Once your custom fonts are uploaded, you can assign them to specific elements on your website using CSS. For example, you can set your custom font for headings, paragraphs, or specific sections.
After your custom font has been uploaded, you can click on its name in the menu and the font’s URL will be automatically pasted to the code area. you should copy it to a notepad and edit the CSS there:
@font-face {
font-family: ‘FontTitle’;
src: url(‘FontURL’);
}
h1 {font-family: ‘FontTitle’;}
h2 {font-family: ‘FontTitle’;}
Here is a realistic example of the code:
@font-face {
font-family: ‘Laisha’;
src: url(‘https://static1.squarespace.com/static/65c2140f1f637f001c75ace7/t/65c2152344eda35df3fb7cf7/1707218211954/Laisha.otf’);
}
h1 {font-family: ‘Laisha’;}
h2 {font-family: ‘Laisha’;}
h3 {font-family: ‘Laisha’;}
4. Preview And Publish
After assigning your custom fonts, preview your website to ensure the fonts appear as intended. Once you’re satisfied with the look, publish your website to make the custom fonts live.
Also, consider the readability and usability of your custom fonts across different devices and screen sizes. Additionally, make sure you have the proper licensing for any custom fonts you use to comply with copyright laws.
By following these steps, you can enhance the visual appeal of your Squarespace website with custom fonts that align with your brand’s identity.